If your SVG imports at the wrong size in LightBurn, measure the imported drawing before changing anything on the laser. A design that is already too small in the workspace needs a different investigation from a drawing that measures correctly on screen but produces an incorrectly sized part.
If your SVG imports at the wrong size in LightBurn, measure the imported drawing before changing anything on the laser. A design that is already too small in the workspace needs a different investigation from a drawing that measures correctly on screen but produces an incorrectly sized part.
Start with a known dimension, compare the same geometry in both applications, and calculate the difference. Then check import settings and the exported file. This order avoids an expensive mistake: recalibrating a machine to compensate for one incorrectly interpreted drawing.
Quick answer: restore the intended dimensions
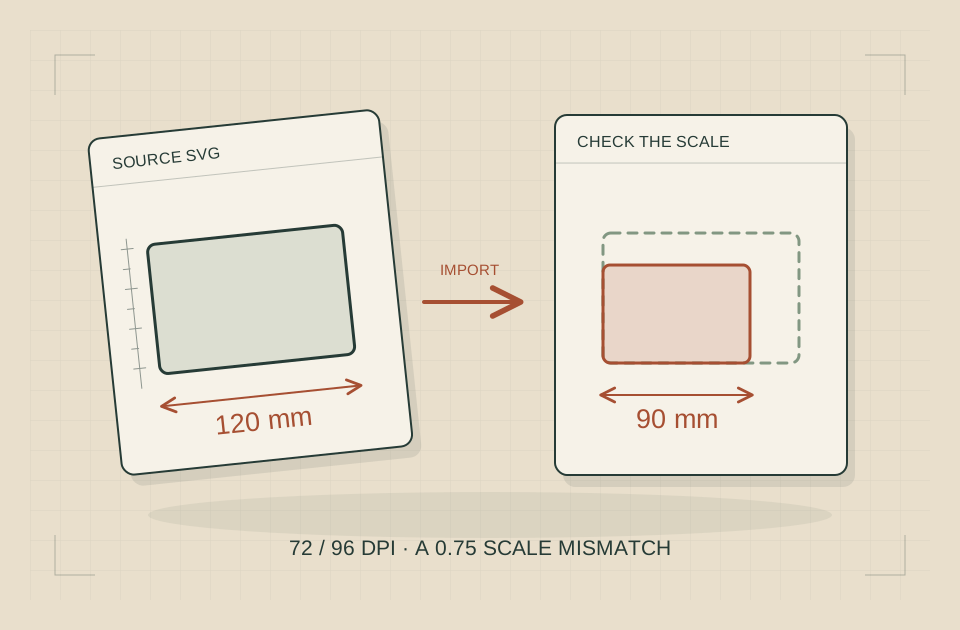
Measure one outline in the source file and the same outline after importing. If a 120 × 60 mm rectangle arrives as 90 × 45 mm, both dimensions are at 75% scale. Open the SVG import controls, try the alternate documented interpretation, and import the original again into an empty project. The acceptance result is 120 × 60 mm in the selected outline—not merely a picture that looks larger on screen.
If width and height are correct in LightBurn but the physical part is wrong, this import workflow is already past its useful boundary. Investigate the output process separately. All examples below are document exercises and calculated dimensions, not machine-test results.
Find the import control in your version
Start with one known dimension. A 120 mm drawing arriving at 90 mm points to a 0.75 scale ratio.
SVG Import Settings: the exact route to the control
- Save the existing project so you can return to its current state.
- In Windows, open Edit → Settings. On macOS, open LightBurn → Preferences.
- Select the Import / Export tab and find SVG Import Settings. Older releases may group the control under File Settings.
- Note the current option before changing it. The documented choices include 96 DPI for an Inkscape-style interpretation and 72 DPI for an Illustrator-style interpretation.
- Open an empty comparison document and import the untouched original SVG. Use File → Import or the import shortcut for your platform.
- Select the reference outline alone. Read W and H in the Numeric Edits toolbar; confirm the displayed unit.
- Try the other import option, then import the original into a fresh comparison document. Existing objects are not the comparison for a new import.
- Compare both dimensions. Keep the setting that reproduces the known reference for this file, and restore your normal preference afterward if this was an exceptional export.
The LightBurn preferences reference documents the import controls. Automatic SVG DPI recognition was added in the 2.0 release notes. An installation using detection may therefore need source-file inspection rather than an override. Record your installed version when comparing screenshots or menu names.
Changing display scaling makes interface elements larger. Changing image engraving DPI affects scan density. Neither is the SVG import control used here.
Find the first place where the size changes
Keep three measurements separate:
- The intended dimension in the original design.
- The dimension of the imported geometry in LightBurn.
- The dimension of a manufactured part, if one already exists.
Do not compare a page width in one application with the width of selected artwork in another. A letter-size artboard can contain a small tag, and a large blank margin is not part of that tag.
Choose an unambiguous feature such as a rectangular outline. Select that outline in the source application and write down its width and height. In LightBurn, select the corresponding outline and read its dimensions. Compare the same objects, with the same units, before considering an explanation.
| Symptom | Likely category | Practical correction |
|---|---|---|
| Both dimensions are 75% of the reference | Uniform import interpretation | Compare the documented 72/96 DPI choices with a fresh import |
| Both dimensions differ by 25.4 | Inch/millimeter interpretation | Confirm the actual format and declared units; inspect DXF settings for DXF files |
| Width changes but height does not | Nonuniform transform or wrong selection | Select the same outline and inspect source transforms |
| The group is smaller but the reference is correct | Missing text or artwork | Restore the missing content before resizing |
| The document is right but the physical part is wrong | Output or manufacturing process | Preserve the correctly sized file and investigate physical output separately |
This table is a way to choose the next check, not a remote diagnosis of your machine. A correctly sized document does not establish focus, material suitability, kerf, or mechanical accuracy.
Make a two-axis size record
A vague report such as “the SVG is too big” leaves out the most useful evidence. Record both dimensions and the units before making a correction.
For example, suppose the source outline is 120 mm wide and 60 mm tall. The corresponding imported outline measures 90 mm by 45 mm. Divide the imported dimension by the intended dimension:
- Width ratio: 90 ÷ 120 = 0.75.
- Height ratio: 45 ÷ 60 = 0.75.
Both axes are at 75% of the intended size. That consistent ratio is a useful clue. It does not prove a particular exporter or setting caused the problem.
Now consider an imported outline measuring 90 mm by 60 mm. The width ratio is still 0.75, but the height ratio is 1.00. A single uniform DPI interpretation cannot, by itself, explain that particular change. Look for a different selection, an asymmetric transform, or an earlier edit before applying a global correction.
Keep enough decimal places to recognize the pattern, but do not mistake displayed precision for manufacturing accuracy. A calculated ratio describes the document comparison. It says nothing about the tolerance of a physical joint.
A practical record needs only a few fields:
| Field | Example entry |
|---|---|
| Source application and version | Your actual editor and installed version |
| Export filename | tag-layout-r03.svg |
| Intended outline | 120 × 60 mm |
| Imported outline | 90 × 45 mm |
| Width and height ratios | 0.75 and 0.75 |
| Import setting observed | Record the actual option shown |
| Correction attempted | One change, followed by a fresh import |
A 72/96 DPI example you can calculate
LightBurn’s SVG Import Settings documentation describes 96 DPI and 72 DPI interpretations associated with Inkscape and Adobe Illustrator. It suggests trying the alternate setting when an SVG imports at an incorrect scale.
That is a specific import setting. It is separate from interface scaling, monitor resolution, and the scan resolution used for an engraving.
The ratio matters in both directions. For a simplified example, imagine coordinates representing a width of 72 units, with no other sizing information changing the interpretation:
- At 72 units per inch, that width represents one inch.
- At 96 units per inch, it represents three-quarters of an inch.
The same coordinate count becomes smaller when interpreted using more units per inch. Conversely, 96 units interpreted at 72 units per inch represents one and one-third inches.
This explains why “33% wrong” is not a sufficient instruction. A design at 75% size needs a different percentage correction from a design at 133⅓% size. The direction of the ratio must match the measurements.
Real SVG files can include explicit dimensions, view boxes, and transforms, so these examples are not predictions for every file. If changing the import option has no effect, do not keep toggling it and assume you missed something. Investigate what the file actually declares.
Also check your release before following an old screenshot. LightBurn’s 2.0 release notes mention automatic SVG DPI detection for Illustrator and Inkscape files. The behavior available in your installation may therefore differ from an older forum walkthrough.
Re-import into a clean document
A useful comparison isolates the import. Otherwise, you may be measuring geometry that was resized earlier or mixed with a previous attempt.
Save the current project under a new name. Preserve the original exported SVG as well. Open a fresh document for the comparison, import the file once, and select only the geometry you are measuring.
After changing an SVG import preference, import the original into a clean comparison document. Measure that new import; objects already in the workspace retain their existing geometry.
Write down the new dimensions and compare them with the previous attempt. A successful result should match the intended reference in both axes. If it fixes width but distorts height, stop: you have not established a reliable correction.
Keep the experiment small. There is no need to add laser power, change controller parameters, or run a material test while answering a question about document dimensions. Those extra changes make the evidence harder to interpret.
If you work across two computers, reproduce the same file transfer and import path on the receiving computer. Our LightBurn Chromebook and tablet guide explains why a drawing device and a supported machine-control computer are separate parts of that workflow.
Inspect width, height, and viewBox in one small SVG
Open a copy of the SVG in a plain-text editor and find its outer svg element. Read its width, height, and viewBox together. A useful test file is small enough that those values are visible without searching through hundreds of paths.
Save the following as reference-100x50.svg. It describes a 120 × 70 mm page containing one rectangular path whose intended geometry is 100 × 50 mm:
<svg xmlns="http://www.w3.org/2000/svg"
     width="120mm" height="70mm" viewBox="0 0 120 70">
  <rect x="10" y="10" width="100" height="50"
        fill="none" stroke="black" stroke-width="0.2" />
</svg>
The outer dimensions define the page. The viewBox maps 120 internal horizontal units across 120 mm and 70 vertical units across 70 mm. The rectangle begins 10 units from each upper edge and spans 100 by 50 units. Its geometry should therefore be evaluated against 100 × 50 mm, not the page’s 120 × 70 mm dimensions. A visible stroke has appearance thickness; compare the underlying rectangular outline in LightBurn.
The W3C SVG coordinate-system specification defines this viewport mapping, including aspect-ratio behavior. In a simple file with matching proportions, dividing physical page width by viewBox width gives the horizontal size per internal unit.
Try reading a second hypothetical declaration: width 120 mm with a viewBox width of 240 maps each horizontal user unit to half a millimeter. A 100-unit rectangle would then span 50 mm if the rest of the proportional mapping matches. This is why changing only the viewBox can change the result rather than repair it.
For a complex file, inspect scaled groups and transforms as well. Return to the source editor to re-export when the mapping is unclear. The Inkscape units explanation distinguishes display units from the file’s real-world mapping. Switching a ruler to millimeters is not the same operation as rescaling the artwork.
Use the same file on the receiving computer
Check software, connection and font requirements before changing hardware.
Do not confuse page size with object size
Suppose you create a 4-inch-wide coaster layout on an 8.5-inch-wide page. After import, you select all objects and see a width that does not match either number. Before changing scale, inspect what was selected.
A hidden guide, an extra rectangle, or a stray point can enlarge the selection. Missing text can shrink it. A different bounding-box convention can make the source editor report a different overall extent from the geometry you intended to transfer.
Use a reference that survives the handoff independently of decorative content. A plain rectangular path with a known width and height is easier to compare than a logo with shadows, clipped images, or text effects.
The reference must have a defined role. If it is only a measurement aid, make sure it will not accidentally become an output contour later. Remove it from the production document or assign it appropriately using the documented tools, then inspect the final output selection.
Do not infer that a picture has the correct dimensions because it fits neatly inside the visible workspace. Zoom level changes appearance. The numerical dimensions of the selected reference provide the useful comparison.
Decide whether to re-export or resize
Re-exporting is usually the more informative option when the same design will be revised repeatedly. It preserves a workflow in which future files can arrive at the intended size without relying on a remembered correction.
Return to the editable original. Verify the reference geometry, remove unintended objects, and export a clearly named revision. Import that revision into a clean comparison document and check both axes again.
Resizing can still be a reasonable document correction when you know the intended dimensions and have verified that all relevant geometry arrived intact. It should be deliberate, recorded, and applied to the correct selection.
For the 90-by-45-mm example, the intended width is 120 mm. The required scale factor is 120 ÷ 90, or approximately 1.3333. Applying that same factor to the height gives 60 mm. Entering the known target width with proportional sizing enabled avoids rounding a percentage by hand.
LightBurn’s Numeric Edits reference explains its size controls and aspect-ratio lock. Confirm the controls in your installed release before making the change.
Do not force both dimensions independently unless nonuniform scaling is actually intended. Stretching a design to make its outer bounds fit can alter circles, text, slot widths, and relative spacing.
When a one-off correction is a poor choice
A file for an interlocking box contains relationships beyond its overall width. Even when a uniform correction is mathematically clear, you must still verify material-dependent fit separately.
Likewise, a purchased design with no stated reference dimensions offers a weak basis for correction. Ask the seller which feature should measure what. A product listing’s preview image is not a dimensioned drawing.
If only one component of a multi-part design is wrong, scaling the entire assembly may fix that component while damaging the others. Identify whether the inconsistency originated inside the source document before adjusting a group.
Missing text can look like a scaling problem
Text introduces another possible mismatch: the geometry being measured may no longer be the same.
LightBurn’s File Management documentation advises having the necessary fonts installed or converting imported text to paths in the source application. Preserve an editable original before outlining text.
Consider a sign where a long subtitle establishes the full width. If the subtitle fails to transfer, selecting the remaining artwork produces a smaller bounding box. Increasing the group size would enlarge the artwork that did arrive without restoring the missing content.
Inspect wording, letter shapes, and the presence of every text object before measuring the whole layout. For a critical transfer, compare a plain reference outline as well as the full design.
Older forum posts may describe limitations that have changed. A thread about missing SVG text in an early release is evidence of a historical problem, not proof of current behavior. Use current documentation and your actual file to decide whether font availability, conversion, or another import limitation is relevant.
SVG and DXF need separate checks
Changing SVG import DPI is not a universal fix for every vector file. Confirm the actual file format, especially when a seller provides an archive containing SVG, DXF, PDF, and raster previews.
LightBurn’s settings reference separates DXF unit handling from SVG import interpretation. A mismatch between inches and millimeters is a different clue from a 72-to-96 ratio.
The arithmetic is useful: one inch equals 25.4 millimeters. A document whose imported dimensions differ by a factor of 25.4 deserves a units investigation. That observation alone does not identify which application made the wrong assumption.
Do not rename a DXF extension to SVG or switch formats repeatedly without checking the resulting geometry. Changing the container can introduce a different import problem while obscuring the first one.
Keep one source file, one export revision, and one recorded comparison for each attempt. If the seller’s SVG and DXF disagree, provide that evidence when asking for a corrected file.
Build a repeatable acceptance check
Once you have a corrected import, save a small record that a future revision can follow. This is particularly useful for repeated nameplate layouts or batches where a subtle size change would waste many blanks.
Before treating the file as accepted, confirm:
- The reference width and height match the intended dimensions.
- Text and decorative elements are present.
- Circles and other proportions look correct.
- Separate parts retain their expected relationships.
- Operation assignments and output selection have been inspected.
- The saved project and original export can be identified by revision.
These checks establish document consistency. They do not approve a material, establish the correct power or speed, or replace the machine’s operating instructions. Use our small-workshop laser setup guide before moving from document preparation to physical work.
If a supplier or software support team must investigate, send a minimal reproducible file rather than a screenshot alone. Include intended dimensions, imported dimensions, application versions, and the exact import path. Remove confidential customer artwork when preparing that example.
Finish with a corrected file, not a changed machine
The most useful outcome is a file whose dimensions you can explain and reproduce. Keep the original, the corrected export or project, and the short measurement record together.
If imported geometry now matches the intended reference, the import-scale question is resolved for that file and workflow. Any remaining difference in a physical part belongs to a separate investigation.
If dimensions still disagree, stop before production and narrow the example further. A plain known-size rectangle often gives support more usable evidence than a complex customer design. A faster computer for laser engraving will not, by itself, correct an incorrectly interpreted coordinate system.
Affiliate link · We may earn a commission on eligible purchases. How funding is disclosed.
Move from a correct file to a working setup
Once the file dimensions are correct, plan the physical installation. Browse workshop accessories for that separate setup task; accessories do not fix SVG scaling.
Sources & specifications
Reviewed 2026-10-17. Compatibility tables apply to the manufacturer's equipment; confirm your exact machine, stock and accessories before use.
docs.lightburnsoftware.com SettingsPreferences ↗
Checked · Technical reference checked during the October 17 article revision; no personal equipment testing claimed.docs.lightburnsoftware.com NewIn2.0 ↗
Checked · Technical reference checked during the October 17 article revision; no personal equipment testing claimed.docs.lightburnsoftware.com SettingsPreferences ↗
Checked · Technical reference checked during the October 17 article revision; no personal equipment testing claimed.www.w3.org coords.html ↗
Checked · Technical reference checked during the October 17 article revision; no personal equipment testing claimed.wiki.inkscape.org Units_In_Inkscape ↗
Checked · Technical reference checked during the October 17 article revision; no personal equipment testing claimed.docs.lightburnsoftware.com NumericEdits ↗
Checked · Technical reference checked during the October 17 article revision; no personal equipment testing claimed.docs.lightburnsoftware.com FileManagement ↗
Checked · Technical reference checked during the October 17 article revision; no personal equipment testing claimed.Independent research. This article contains an affiliate recommendation; we may earn a commission on eligible purchases. How funding is disclosed.